




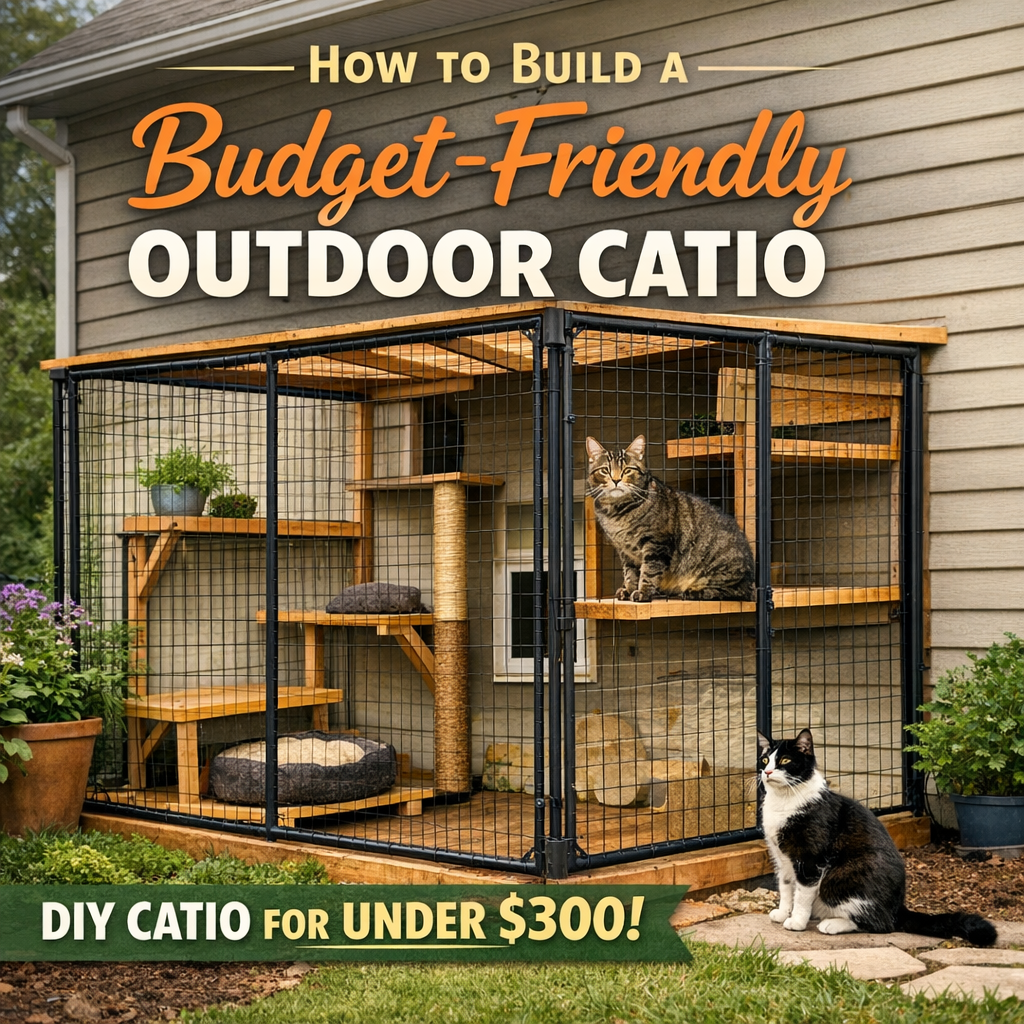
- Build a professional-grade DIY catio for under $300 by repurposing a 4x8x6 dog kennel as a sturdy frame and attaching it to an existing exterior wall.
- Use cost-effective materials like polycarbonate roof panels ($27), plastic chicken wire ($26), and heavy-duty zip ties to ensure a weather-resistant and secure enclosure.
- Enhance your cat’s health and enrichment by installing a window cat door for 24/7 access and adding vertical space with recycled wooden shelving or ramps.
- Prioritize safety by ensuring all mesh is pulled taut, securing joints with bulk zip ties, and performing regular stability checks to protect pets from local wildlife.
Table of Contents
- How to Build a Budget-Friendly Outdoor Catio
- Budget Materials for Building a Catio
- Step-by-Step DIY Construction Process
- Choosing Cost-Effective Enclosure Designs
- Creating a Safe Roof with Minimal Cost
- Safety Considerations Without Added Costs
- Budget Materials for Building a Catio
- Step-by-Step DIY Construction Process
- Choosing Cost-Effective Enclosure Designs
- Budget Materials for Building a Catio
- Creating a Safe Roof with Minimal Cost
- Maximizing Space and Maintaining Safety on a Budget
- Safety Considerations Without Added Costs
- Creating a Safe Roof with Minimal Cost
- Maximizing Space and Choosing Cost-Effective Enclosure Designs
- Step-by-Step DIY Construction Process and Vertical Enrichment
- Maintaining Safety and Access on a Budget
- Maintaining Safety on a Budget
- Safety Considerations Without Added Costs
- Creating a Safe Roof With Minimal Cost
- Maximizing Space Without High Expenses
- Frequently Asked Questions About Your Catio Project
How to Build a Budget-Friendly Outdoor Catio
A catio is a specialized, cat-friendly space that allows your pets to experience the outdoors safely. Whether you have a tiny balcony or a massive yard, building a catio is the ultimate way to boost cat health and cat enrichment. Think of it as a luxury sunroom for your fur babies where they get the breeze and the bird-watching while you get total peace of mind.
Budget Materials for Building a Catio
When you start your catio construction, the first stop should be Home Depot. To keep things budget-friendly, many creators like Shirley Stephany Davila recommend using a 4x8x6 dog kennel as the primary frame. This pre-assembled structure often costs around 281.65 dollars, providing a sturdy foundation without the need for complex woodworking.
To keep the feline safety high and the costs low, you can use plastic chicken wire or vinyl coated metal fencing to wrap the frame. A roll of plastic chicken wire usually costs about 26 dollars and is much easier to handle than heavy hardware cloth. This ensures your pet enclosure is secure from predators while keeping your cat inside.
For the roof, polycarbonate roof panels are a game changer for any outdoor cat enclosure. At approximately 27 dollars each, these panels provide a clear view of the sky while protecting your cats from rain. Using these materials allows for a professional look that enhances pet quality of life without the professional price tag.
Step-by-Step DIY Construction Process
Ready to build a catio? Start by clearing a level space against a wall of your home. If you are following popular guides on YouTube or Facebook, you will see that assembling the dog kennel catio frame is the quickest way to get results. Most of these kits simply bolt together, making it a perfect project for those using Chrome or Firefox to research easy assembly tips.
Once the frame is up, it is time to secure the enclosure. Use zip ties to attach your plastic chicken wire or vinyl fencing to the metal bars. This method is favored by DIY experts like RoBeaird because it requires no special tools and stays incredibly tight. Make sure there are no gaps near the ground where a curious cat might squeeze through.
The final structural step is installing the cat door. You can choose a window cat door or a wall-mounted version to give your cats 24/7 access to their new sanctuary. Simply follow the manufacturer instructions to cut the opening and seal the edges, ensuring a draft-free fit between your home and the catio design.
Choosing Cost-Effective Enclosure Designs
A smart cat enclosure DIY strategy involves using your home’s existing architecture. By placing the catio against a siding wall, you save on the cost of one entire side of fencing. This design choice maximizes space without high expenses, allowing you to spend more on interior perks like scratching posts or perches.
If a metal kennel is not your style, PVC pipe structures offer another low-cost alternative. PVC is lightweight, weather-resistant, and easy to cut with basic household tools. You can find plenty of visual and tutorial guides on Edge or Samsung mobile devices that show how to glue these pipes into a custom feline jungle gym.
Repurposing materials is the secret to a truly budget-friendly catio. Look for old wooden pallets or leftover shelving to create vertical climbing levels. This focus on animal welfare and rescue-style ingenuity ensures your cats have plenty of horizontal and vertical space to explore without breaking the bank.
Creating a Safe Roof with Minimal Cost
A safe outdoor space needs a roof that can handle the elements. Polycarbonate roof installation is the most cost-effective method because the panels are lightweight and durable. Instead of expensive roofing nails and flashing, you can secure these panels directly to the top of your kennel frame using heavy-duty zip ties or simple metal clamps.
This minimalist approach to roofing provides a safe outdoor space at low costs while ensuring the interior stays dry. If you live in a very sunny area, these panels also provide a bit of UV protection for your cats. It is a simple addition that significantly boosts the utility of your catio project during rainy seasons.
By securing the panels firmly, you prevent any rattling during high winds, which can spook a nervous cat. This focus on maintaining safety on a budget ensures that your catio remains a peaceful retreat. Always double-check your zip ties every few months to ensure the sun has not made them brittle, replacing them as needed for pennies.
Safety Considerations Without Added Costs
Feline safety is the number one priority, but it does not require expensive high-tech sensors. The most important safety considerations involve the integrity of your mesh and the stability of the floor. Ensure your chicken wire is pulled taut and fastened every few inches to prevent any paw-sized gaps from forming over time.
Using sturdily secured chicken wire and reliable roofing ensures your cats’ safety without overspending on professional contractors. If you are building on grass, consider burying a few inches of the fencing underground or weighing the bottom down with heavy stones from your garden. This prevents both escapes and unwanted visitors like neighborhood dogs or raccoons.
Finally, always perform a push test on all shelves and ramps. If it wobbles when you push it, it will definitely wobble when a ten-pound cat jumps on it. Using scrap wood and basic screws to reinforce these areas is a free way to prevent injuries. With these steps, you have successfully completed a home improvement for pets project that looks great and functions perfectly.
Budget Materials for Building a Catio
When you start your catio project, the first thing you think about is the cost. You do not need a professional contractor to create a safe outdoor space that looks like a million dollars.
Many cat parents, like Shirley Stephany Davila, have found that repurposing affordable items is the best way to go. A popular hack for a budget-friendly catio involves using a 4x8x6 dog kennel from Home Depot.
This pre-made frame typically costs around 281.65 dollars and saves you from the headaches of advanced woodworking for beginners. It provides a sturdy foundation for any DIY catio without requiring a garage full of power tools.
Choosing Cost-Effective Enclosure Designs
Building a sturdy enclosure is easier when you assemble a dog kennel against an exterior wall of your home. This method uses your house as one side of the structure, maximizing space without high expenses.
To keep the project under a 300 dollar budget, you can supplement the frame with affordable vinyl coated metal fencing or PVC pipe structures. These materials are durable enough to withstand the elements while keeping your feline friends secure.
By integrating these catio ideas into your catio construction, you ensure your pets have plenty of room to roam. This setup provides essential cat enrichment and improves cat health by encouraging movement and mental stimulation.
Creating a Safe Roof with Minimal Cost
Protection from the elements is vital for outdoor pet safety. You can find polycarbonate roof panels for about 27 dollars each at Home Depot to keep the rain off their furry heads.
Competitors and DIY experts recommend securing these polycarbonate roof panels using heavy duty zip ties. This simple polycarbonate roof installation method provides a safe outdoor space at a fraction of the cost of traditional roofing hardware.
Using zip ties ensures a tight fit that will not rattle in the wind. It is a brilliant way to maintain safety on a budget while ensuring your cats, like Annie and Minnie, stay dry during a sudden downpour.
Maximizing Safety and Access on a Budget
If you want to go even cheaper for the walls, plastic chicken wire is a fantastic alternative for the sides, costing only about 26 dollars. This material allows for great airflow and visibility for your feline roommates.
To give your cats independent outdoor access, you will need to install a cat door. A window cat door is a popular choice, often priced around 125.40 dollars at pet specialty shops, allowing for easy transitions from the living room to the enclosure.
For more inspiration, you can search for step-by-step tutorials on Google, YouTube, or Facebook. These platforms are filled with visual guides that you can easily browse on your Samsung phone using Chrome, Firefox, Edge, or any modern browser.
| Material Item | Estimated Cost | Source/Vendor |
|---|---|---|
| 4x8x6 Dog Kennel | 281.65 dollars | Home Depot |
| Polycarbonate Roof Panels | 27.00 dollars each | Home Depot |
| Plastic Chicken Wire | 26.00 dollars | Hardware Stores |
| Zip Ties (Bulk Pack) | 3.00 dollars | General Retailers |
| Window Cat Door | 125.40 dollars | Pet Specialty Shops |
Maintaining Safety Without Added Costs
Securing your catio materials properly is the most important part of the build. Experts like RoBeaird emphasize that pet quality of life enhancement should never come at the expense of security.
Always double check that your plastic chicken wire or vinyl fencing is sturdily secured to the frame. Using a bulk pack of zip ties is an affordable way to ensure there are no gaps for an adventurous cat to squeeze through.
This focus on animal welfare and rescue standards ensures your pet enclosure remains a sanctuary. By following these budget-friendly DIY projects, you can build a professional-grade cat enclosure DIY style without the professional price tag.
Step-by-Step DIY Construction Process
Ready to start your catio construction? It is easier than it looks, even if your woodworking for beginners skills are a bit rusty. Most people start by searching for tutorials on YouTube or Google using browsers like Chrome, Firefox, Edge, or even their Samsung mobile devices to see the visual layout.
First, choose your location for the outdoor cat enclosure. Many people prefer placing the structure against a side wall or directly outside a window. This allows you to install a cat door or a window cat door for 24/7 outdoor access, ensuring your feline friends can transition between the living room and their safe outdoor space whenever they please.
Next, assemble your frame. If you are using a dog kennel catio design, the panels usually bolt together in minutes. This is where Cat Enclosure Construction becomes a breeze. Once the walls are up, it is time for the roof, which is vital for feline safety and weather protection.
Creating a Safe Roof with Minimal Cost
You can create a professional-grade cover without the professional price tag. Secure your polycarbonate roof panels using a drill and plenty of zip ties. At approximately 27 dollars per panel, these are a steal compared to traditional shingles.
This method is much faster than traditional roofing and keeps the pet enclosure structure lightweight. By securing panels with zip ties, you ensure outdoor pet safety while keeping the catio project flexible for future adjustments.
Many DIY enthusiasts, including Annie and Minnie from the Facebook catio communities, recommend this exact approach. It provides a sturdy shield against the elements while maintaining a clear view of the sky for your sun-worshipping cats.
Maximizing Space and Cat Enrichment
Finally, add the furniture to your catio design. Use simple wooden planks to create shelves at different heights. This provides essential cat enrichment by giving them vertical space to climb and lounge, significantly boosting their cat health and pet quality of life enhancement.
You can expand the internal space by utilizing existing wall space and simple vinyl coated metal fencing or PVC pipe structures. These catio ideas allow you to build a complex playground without high expenses or advanced tools.
Do not forget the floor! If you are not building on a deck, consider plastic chicken wire or vinyl fencing at the base to prevent digging. This keeps the budget-friendly DIY projects secure from both the inside and the outside, ensuring your cats stay in and local wildlife stays out.
Maintaining Safety on a Budget
The key to a successful build a catio mission is focusing on safety considerations without added costs. You do not need expensive hardware when zip ties and standard screws can do the job. Follow the lead of experts like RoBeaird and Shirley Stephany Davila by double-checking every seam of your plastic chicken wire.
A typical DIY catio project using these methods often costs under 300 dollars. By choosing catio materials like the Home Depot kennel and repurposing items you already have, you create a high-end experience on a budget. It is the ultimate way to show your pet some love while keeping your wallet happy.
Choosing Cost-Effective Enclosure Designs
A budget-friendly catio does not have to look cheap. It just has to be smart. Using cat enclosure DIY techniques like PVC pipe structures can save you hundreds of dollars compared to custom cedar builds.
You can find plenty of catio ideas on Facebook groups or Pinterest. Some users recommend using vinyl coated metal fencing because it is durable and blends into the landscape better than bright silver wire.
One of the best ways to maximize space without high expenses is to utilize an existing wall of your home as one side of the catio. This reduces the number of panels you need to buy and makes the structure more stable.
“A catio provides the best of both worlds: fresh air for the cat and safety for the local wildlife.”
Budget Materials for Building a Catio
When you are looking for catio materials that will not break the bank, the secret is often found in the garden aisle. Many savvy builders start with a 4x8x6 dog kennel from Home Depot, which typically costs around 281.65 dollars.
This pre-made frame provides a sturdy foundation for your catio construction without the need for advanced woodworking for beginners skills. It is much faster than building a wooden frame from scratch and offers immediate feline safety.
To keep the interior contained, you can use plastic chicken wire which costs approximately 26 dollars. This material is easy to handle and budget-friendly while still providing a secure cat-friendly space for your pets to lounge.
Creating a Safe Roof with Minimal Cost
A safe outdoor space needs protection from the elements and potential escape attempts. You can create a professional look using polycarbonate roof panels which cost about 27 dollars each at stores like Home Depot.
These panels allow light to reach your cat while keeping them dry during a drizzle. For a truly budget-friendly catio, you can secure these roofing materials using heavy-duty zip ties rather than expensive hardware kits.
Ensuring the roof is slanted will help with drainage and long-term durability. This simple addition significantly boosts cat health by allowing them to enjoy the outdoors even when the weather is less than perfect.
Maximizing Space and Maintaining Safety on a Budget
If you want to give Annie or Minnie more room to roam, consider a catio design that bridges the gap between your home and the enclosure. Using a window cat door or a standard cat door allows for 24/7 outdoor access.
RoBeaird and other DIY enthusiasts often suggest using vinyl coated metal fencing to extend the reach of a basic pet enclosure. This allows you to build a catio that feels massive without a massive price tag.
By following tutorials from Shirley Stephany Davila or searching YouTube on your Samsung phone, you can learn how to reinforce every joint. Sturdy installation is the most important factor for outdoor pet safety and pet quality of life enhancement.
Safety Considerations Without Added Costs
You do not need a professional contractor to ensure your DIY catio is secure. Most safety features come down to how well you fasten your materials during the catio project assembly phase.
Check all edges of your plastic chicken wire or vinyl fencing for sharp points. Use extra zip ties at every corner of your dog kennel catio to prevent gaps from forming over time as the structure settles.
By focusing on these small details, you provide incredible cat enrichment and a secure environment. Your cats get the stimulation they crave, and you get the peace of mind knowing they are safe from local wildlife.
Creating a Safe Roof with Minimal Cost
The roof is a vital component for feline safety and overall cat enrichment. You want a topper that blocks harsh UV rays while still letting in that sunshine for afternoon naps.
Polycarbonate roof panels are the gold standard for any catio project. These panels are impact-resistant, affordable, and far more durable than basic plastic chicken wire when the weather gets moody.
To keep your catio construction budget-friendly, skip the heavy shingles and expensive metal roofing. Those require advanced woodworking for beginners and heavy-duty supports that drive up costs.
Securing Your Roof on a Budget
Instead of fancy hardware, use heavy-duty zip ties to secure your lightweight polycarbonate roof panels directly to the top of your pet enclosure. This is a classic move recommended by DIY experts like Annie and Minnie on Facebook.
This method ensures a safe outdoor space without the need for specialized Home Depot catio kits. It is a quick, effective way to finish your cat enclosure DIY project while keeping the structure lightweight and manageable.
If you are building a dog kennel catio, these panels often fit perfectly across the frame. You can find installation tutorials on YouTube or Google by searching for creators like Shirley Stephany Davila or RoBeaird for visual guidance.
Maximizing Space and Safety Without High Expenses
Many cat owners maximize space by building their enclosure against a home wall. This allows you to install a cat door or a window cat door for easy outdoor access without building a fourth wall of fencing.
By utilizing existing structures and securing your roof with zip ties, you maintain high safety considerations without added costs. It is about working smarter, not harder, to improve your pet quality of life enhancement.
If you are on a very tight budget and live in a dry climate, vinyl coated metal fencing or vinyl fencing can work as a roof. However, it will not protect your cat from rain like polycarbonate roof installation will.
Factual Budgeting for Your Catio Roof
At stores like Home Depot, a single polycarbonate panel typically costs around 27 dollars. For a standard catio design, you might only need two or three to provide full coverage and shade.
Compare this to custom cedar or shingle roofs which can cost hundreds in lumber and labor. Using these budget-friendly DIY projects techniques keeps your total build cost under 300 dollars for a high-quality finish.
Whether you are browsing on Chrome, Firefox, Edge, or your Samsung mobile device, you will find that the most successful builds focus on sturdy materials like PVC pipe structures and reliable roofing to ensure cat health.
Maximizing Space and Choosing Cost-Effective Enclosure Designs
You do not need a massive yard for a successful catio project. Many DIY catio builders, like Annie and Minnie, find that narrow spaces between a house and a fence are perfect for a feline paradise. Even a space 4 to 5 feet wide provides plenty of room for cat health and play.
A popular strategy for choosing cost-effective enclosure designs involves using a pre-made dog kennel catio from Home Depot. By assembling a 4x8x6 dog kennel against a flat exterior wall, you create a sturdy frame that reduces the need for complex woodworking for beginners. This setup often costs under 300 dollars, keeping your catio construction budget-friendly.
To further maximize space without high expenses, utilize existing wall space and simple fencing to expand the enclosure size. Using vinyl coated metal fencing or affordable plastic chicken wire allows you to customize the perimeter. This approach ensures your cats have a safe outdoor space to explore without the price tag of a professional contractor.
Step-by-Step DIY Construction Process and Vertical Enrichment
The step-by-step DIY construction process starts with a solid foundation. Once your frame is up, use zip ties to secure your enclosure materials. This method is a favorite on YouTube and Facebook DIY groups because it is fast, secure, and requires no specialized tools beyond a pair of snips.
Use verticality to your advantage since cats love to be high up. By adding staggered shelves, you triple the usable area for your cat without increasing the footprint of the enclosure. This is essential for cat enrichment, providing your pets with various vantage points to watch birds or nap.
Repurposing materials like old ladders or scrap wood for ramps is a brilliant way to save money. You can often find these items for free on local community boards. For inspiration, check out creators like RoBeaird or Shirley Stephany Davila, who showcase how simple materials can be transformed into luxury feline lofts.
Maintaining Safety and Access on a Budget
Maintaining safety on a budget is all about the details. Ensure your plastic chicken wire is pulled taut and secured every few inches. If you are using a PVC pipe structure, make sure the joints are glued properly to prevent the frame from wobbling during a midnight zoomie session.
Installing a cat door or a window cat door is the final step for providing seamless outdoor access. This allows your pet to move between the living room and the catio whenever they please. You can find affordable cat door options on Google or via the Chrome browser to compare prices across different retailers.
Safety considerations without added costs include regular inspections of the zip ties and polycarbonate roof installation. Whether you are browsing for ideas on a Samsung tablet or your Edge browser, remember that pet quality of life enhancement does not require a fortune. A well-built, budget-friendly catio provides peace of mind and endless entertainment for your furry friends.
Maintaining Safety on a Budget
Safety is the most important part of outdoor pet safety when managing a catio project. You must ensure there are no gaps larger than two inches to keep your feline friends from performing a daring escape act.
Plastic chicken wire and vinyl coated metal fencing are your best friends here. They are affordable and effective, but you should check them regularly for any wear or tear that could compromise feline safety.
Budget Materials for Building a Catio
When sourcing catio materials, you can find high quality options without the luxury price tag. Many builders like Shirley Stephany Davila recommend starting with a 4x8x6 dog kennel catio from Home Depot, which typically costs around 281.65 dollars.
To keep the rain off your cat’s head, polycarbonate roof panels are a fantastic choice at about 27 dollars each. If you are looking for the ultimate cost-effective option, a roll of plastic chicken wire for the enclosure walls can cost as little as 26 dollars.
Step-by-Step DIY Construction Process
The catio construction process is surprisingly simple, even if woodworking for beginners is a new hobby for you. You start by assembling the pre-made kennel frame and securing it against a sturdy wall of your home.
Once the frame is up, use a generous amount of zip ties to attach your fencing and roof. Finally, install a window cat door or a standard cat door to give your pets seamless outdoor access from the living room.
Creating a Safe Roof with Minimal Cost
A safe outdoor space needs protection from the elements and predators. Polycarbonate roof installation is the gold standard for budget-friendly DIY projects because the panels are lightweight and easy to handle.
Instead of expensive screws and brackets, most builders secure these panels with heavy duty zip ties. This method provides a secure, weather resistant cover that ensures pet quality of life enhancement without breaking the bank.
Safety Considerations Without Added Costs
You do not need a degree in engineering to ensure your cat enclosure DIY is stable. Always anchor the structure to the ground or the house to prevent it from tipping during high winds or if a larger animal wanders into your yard.
Check your local Facebook groups or search YouTube and Google using Chrome, Firefox, or Edge for community tips. Many owners of RoBeaird designs suggest using PVC pipe structures or vinyl coated metal fencing to reinforce weak spots for extra security.
In short: use zip ties like they are going out of style. They are cheap, strong, and easy to replace, making them the secret weapon for any cat health and cat enrichment focused build.
Safety Considerations Without Added Costs
You do not need high tech sensors or expensive security systems to keep your cat safe. Simple catio construction choices make all the difference when you are watching your budget. For example, ensure the cat door or window cat door has a locking mechanism for nighttime security.
Check the perimeter for any sharp edges on your catio materials before letting the feline supervisors inside. Sand down any rough wood if you are practicing woodworking for beginners. A little bit of manual labor costs nothing but keeps those precious paws safe from splinters.
Securing panels with zip ties and ensuring a sturdy installation is a great way to maintain safety without buying expensive hardware. Many DIY experts like Shirley Stephany Davila recommend double checking every connection point. This ensures your outdoor cat enclosure remains a safe outdoor space even during a case of the zoomies.
Always supervise your cat during their first few visits to the new cat-friendly space. Watch how they interact with the plastic chicken wire and the height of the shelves to ensure they are comfortable. If you see them struggling with a jump, you can easily adjust your catio design on the fly.
Creating a Safe Roof With Minimal Cost
A secure roof is vital for outdoor pet safety to prevent escapes and keep out unwanted visitors. You can create a professional grade shield using polycarbonate roof panels. These are often available at Home Depot for around 27 dollars each and provide excellent protection from rain and sun.
To keep costs low, many builders secure these panels using heavy duty zip ties instead of specialized mounting kits. This method is a staple of budget friendly DIY projects because it is fast and incredibly effective. It ensures your cat health is protected from the elements without a massive bill.
If you are looking for more catio ideas, search for tutorials on YouTube or Facebook groups dedicated to cat enrichment. Communities often share how to use basic tools and Chrome or Firefox browsers to find the best deals. Whether you use Edge or a Samsung mobile device, the wealth of free knowledge online is your best resource.
Always ensure your roof has a slight slope to prevent water from pooling. This simple woodworking for beginners trick extends the life of your catio materials significantly. By preventing rot and rust, you ensure the pet quality of life enhancement lasts for years to come.
Maximizing Space Without High Expenses
You can maximize your catio project by utilizing existing structures like an exterior house wall. This reduces the number of sides you need to build, saving you money on vinyl coated metal fencing or wood. Many successful designs, like those seen from RoBeaird, leverage the home as a primary anchor.
Using simple fencing to expand the enclosure size is a clever way to increase cat enrichment. You do not need a massive budget to give Annie and Minnie more room to roam. Often, a well placed shelf or a few PVC pipe structures can add vertical space that cats crave more than floor square footage.
By focusing on height rather than width, you save on expensive roofing and flooring materials. This approach to cat enclosure construction provides a stimulating environment for your pets. It allows them to climb and observe their kingdom from a safe, elevated vantage point.
Remember that the goal is animal welfare and rescue prevention. A safe, budget friendly catio keeps your feline friends from wandering into traffic or encountering predators. With a bit of creativity and some basic supplies, you can build a paradise that rivals any high end custom build.
Expert Insight
“There are multiple ways to add vertical space to increase your cat’s sense of territory. In a multicat home especially, vertical territory can go a long way in maintaining peace and harmony.”, Pam Johnson-Bennett, Cat Behaviorist
Frequently Asked Questions About Your Catio Project
How much does a basic DIY catio cost?
A basic setup using a dog kennel catio frame and polycarbonate roof panels usually costs under 300 dollars. If you repurpose materials or use PVC pipe structures, you can get the price closer to 100 dollars.
Many builders like Shirley Stephany Davila suggest sourcing a 4x8x6 dog kennel from Home Depot for approximately 281.65 dollars. Adding polycarbonate roof panels at 27 dollars each provides a professional finish without the professional price tag.
Is chicken wire safe for cats?
Yes, but vinyl coated metal fencing or plastic chicken wire is often preferred for feline safety. These materials are softer on paws and more resistant to rust than standard metal wire found in basic woodworking for beginners.
Plastic chicken wire used for enclosure walls often costs around 26 dollars. This budget-friendly catio choice ensures your pets like Annie and Minnie stay secure while enjoying their safe outdoor space.
Do I need a permit to build a catio?
Usually, no. Because most catios are considered temporary structures or pet enclosure additions, they do not require formal permits. However, always check your local Google search for city specific rules.
Check platforms like Facebook or YouTube for local community groups where neighbors share their catio design experiences. Using browsers like Chrome, Firefox, or Edge on your Samsung device can help you find specific zoning laws for your area.
How do cats get in and out?
Most owners install a cat door or a window cat door. This gives your pet the freedom to choose when they want to enjoy their cat-friendly space and provides essential cat enrichment.
Installing a cat door is a simple step-by-step DIY construction process. You can secure the entry point to a basement window or a side wall to ensure easy outdoor access for your feline supervisors.
What are the best budget materials for building a catio?
The most cost-effective catio materials include a sturdy dog kennel catio frame and zip ties for securing components. Using zip ties to attach polycarbonate roof panels is a common trick used by RoBeaird and other DIY enthusiasts.
Vinyl coated metal fencing and PVC pipe structures offer durability for outdoor pet safety. These materials help you build a catio that enhances pet quality of life enhancement without breaking the bank.
How can I ensure safety on a budget?
Maintaining safety on a budget involves securing all panels with heavy-duty zip ties and checking for sharp edges. A sturdy catio construction does not require high-tech sensors, just reliable materials like vinyl fencing.
Ensure the cat enclosure DIY project is anchored firmly against a wall. This simple catio idea maximizes space and stability, providing a safe environment for animal welfare and rescue cats alike.